
Why use GTM with Magento 2?
Google Tag Manager launched in 2012, but I’ll be honest and say I wasn’t an early adopter. I had a good internal dev team at the time so adding any custom JavaScript code I needed to a website wasn’t particularly difficult, and I did have some niggling concerns about the seemingly unnecessary overhead.
But, as time has gone on and I’ve worked more with external developers and bigger marketing teams, the benefits GTM brings have become a lot more apparent. Tag Manager support is now natively included in Magento 2 Commerce (formally known as Enterprise) and is in effect the “recommended” method for session tracking now on Magento via Google Analytics. So, if you’ve still not yet taken the plunge, now is probably the time to be brave.
You’ll need a Google Analytics account (you probably already have one of these) and a Google Tag Manager container in place also.
Step 1 – Set up Google Analytics
The key settings to enable within your Google Analytics account for Magento 2 ecommerce tracking are:
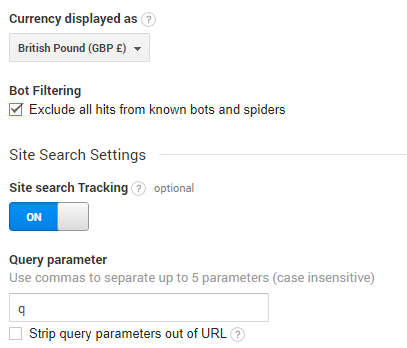
- View Settings – Go to Admin -> View -> View Settings and make sure your ‘Currency displayed as’ is the currency you want GA to report in, and also ensure you set ‘Site Search Settings’ to ‘On’ and the ‘Query parameter’ to ‘q’:
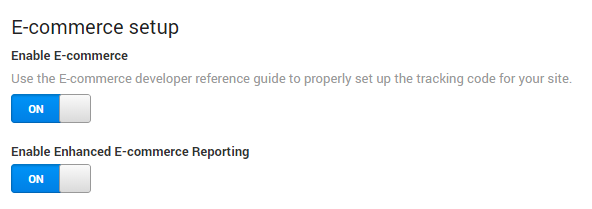
- Ecommerce Tracking – Go to Admin -> View -> E-commerce Settings and ensure ‘Enable E-commerce’ and ‘Enable Enhanced E-commerce Reporting’ are both set to ‘ON’:
- It’s also worth enabling ‘Demographics and Interest Reports’; this can be enabled under ‘Property Settings’ in the admin section of your Analytics account.
- There are of course many other things you should set up in your Google Analytics account for best practice ecommerce tracking, but I’ll cover those in a future post. The above setup will allow you to fully track your Magento ecommerce performance.
Step 2 – Create GTM account
If you don’t already have an account set up with Google Tag Manager, you can create one easily and for free. Simply visit https://tagmanager.google.com/ and follow the instructions online. The official Google instructions can be handy also if you have any issues.
One little thing to remember is that when you create an account within GTM for your site, a new container for that site will automatically be created ready for use. Once you have a GTM container set up for your site, you’re ready to move onto the next step.
Step 3 – Import my JSON file
Google Tag Manager handily allows you to import pre-created JSON configuration files into any container, which makes this next bit a lot easier. The official Magento 2 documentation for Google Tag Manager gives a good base for this (and my file is based on theirs), but whilst that file contains all the tags and triggers needed to track ecommerce actions, it lacks one key thing really needed to make GTM work for Magento 2; variables.
So in a GTM sense, what are variables? Magento 2 Commerce populates a full data layer with useful information, but without setting up custom variables in your GTM container, you can’t (well, not easily) access Magento 2 data layer values in your Google Tag Manager account. My little file has a number of these crucial variables set up ready for use.
Click here to download my Google Tag Manager template file
Simply unzip the download file and upload the JSON file to your Google Tag Manager account via Admin -> Import Container.
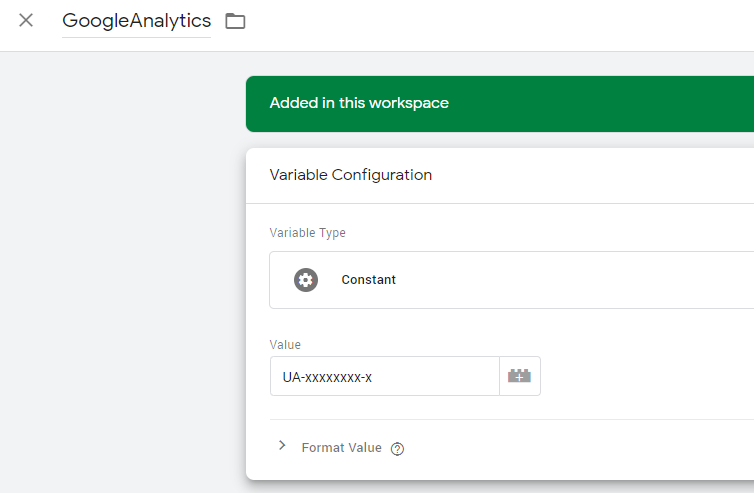
Finally, edit the newly created ‘GoogleAnalytics’ variable in Tag Manager and replace the ‘UA-xxxxxxxx-x’ value with your Tracking ID from Google Analytics. Save the new value, publish your changes and you’re all set.
Step 4 – Set up Magento
Enabling Tag Manager in Magento 2 Commerce is quick and easy; in your Magento admin go to Stores -> Configuration -> Sales -> Google API where you’ll see a screen as below:
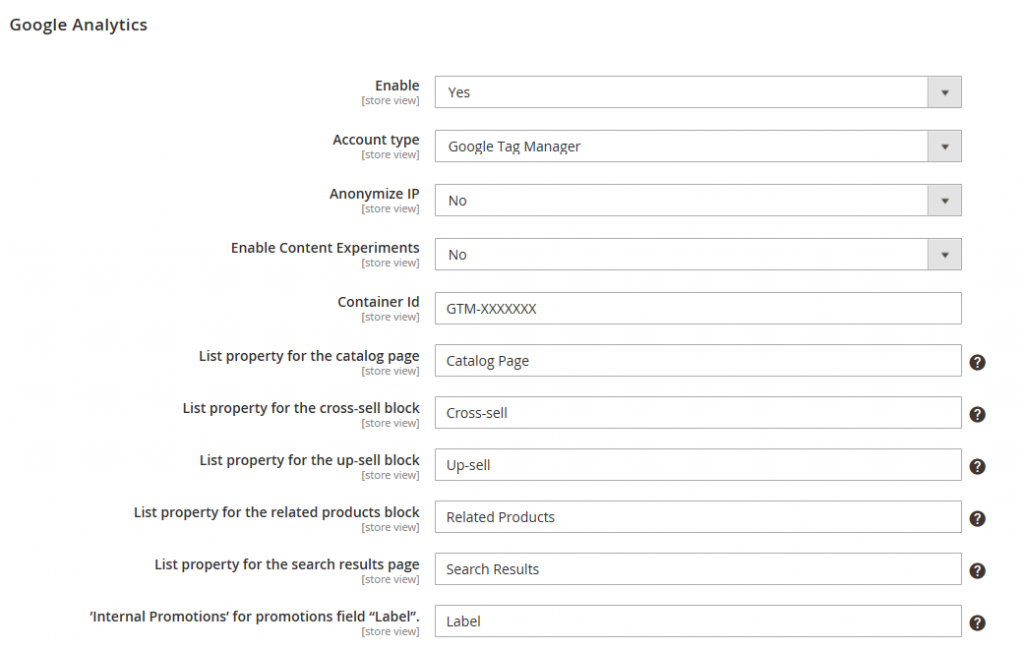
Ensure ‘Account type’ is set to ‘Google Tag Manager’ and set the ‘Container Id’ to the ID provided in your Google Tag Manager account. The rest of the settings shouldn’t need changing.
In addition to changing your default config, these settings can be set on both a website and store view level, so if you’re running Magento as a multi-store environment, it’s absolutely possible to have separate container IDs for each site and indeed you can enable Google Tag Manager on some sites and not others if you wish.
A final little note, Google retired Content Experiments in 2019 so you’ll never need to set this option to ‘Yes’. Google Optimize can be used through Tag Manager on Magento without needing to enable this setting.
Once you’ve saved your changes you’re good to go; Magento is now set up and ready for use with Google Tag Manager.
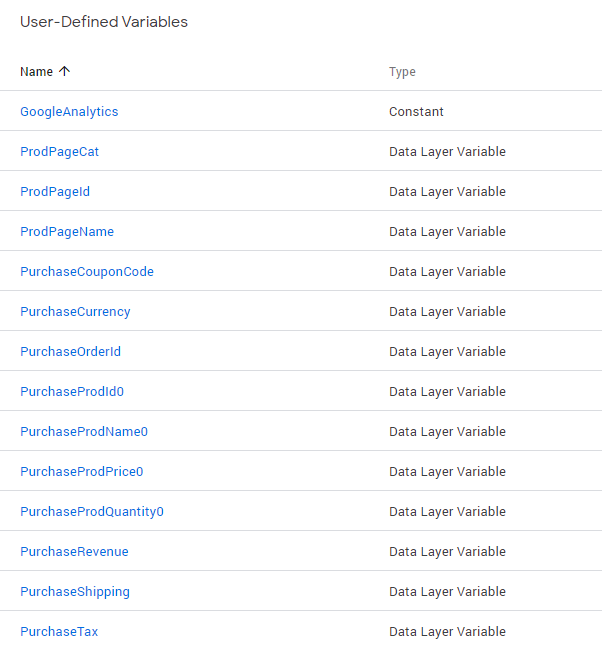
What Triggers and Variables are now available in Tag Manager?
So, you’ve imported my little file and you’ve got all these triggers and variables in place, but what can you actually do with them? Firstly, let’s just list out what you now have access to for reference:
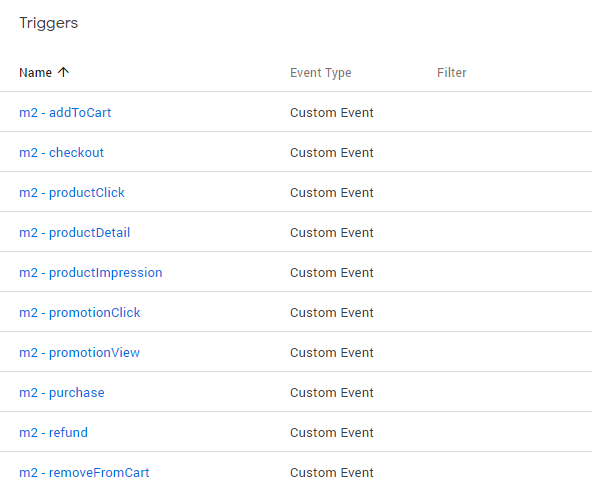
Triggers allow you to fire Tags based on certain events; e.g. the ‘m2 – purchase’ trigger can be used to run a particularly tag when a customer completes a purchase on your Magento 2 store.
The new Variables you have available take data stored in the Magento 2 Data Layer which can then be passed to the Tags you’re creating.
Probably the simplest example of this is tracking revenue from Bing Ads on Magento 2. The tag for this is pre-built into Tag Manager, so you just need to populate the Goal Value with your new PurchaseRevenue variable as shown:
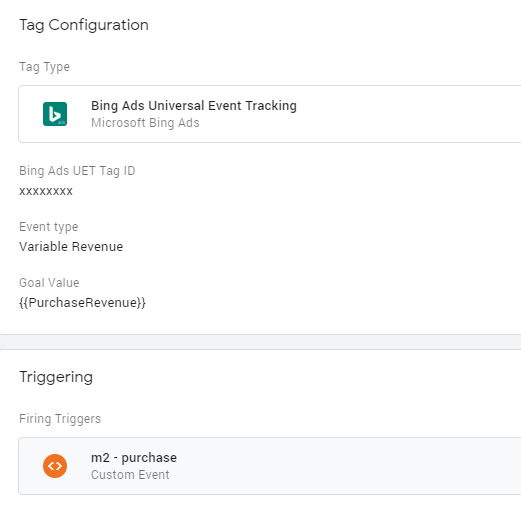
Simple as that; now when a customer completes a purchase, the revenue value from the data layer in Magento 2 will be passed through as part of the Bing tag (and Bing will do the rest).
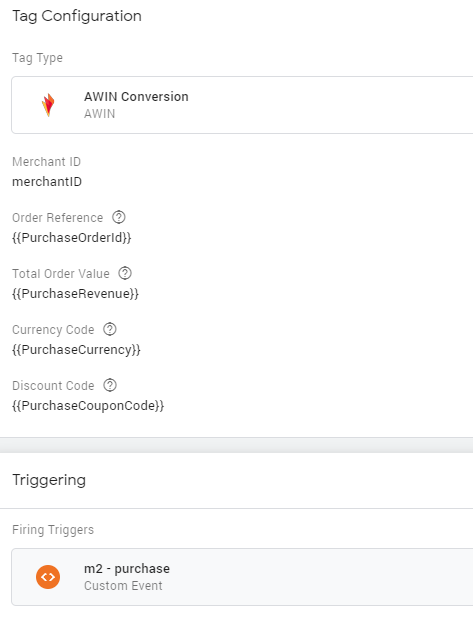
For a slightly more complex example, we can look at the Awin (formally Affiliate Window) conversion tag, another tag that’s pre-built into Google Tag Manager. Your newly created variables make setting up this tag a breeze:
There are naturally more values available in the Magento 2 data layer I’ve not referenced in my custom variables and of course, it’s possible to do clever manipulation of the variables using JavaScript (say if you wanted to pass through a full array of products ordered to a tag, rather than just the first one) but that’s a little outside the scope of this simple guide.
And that’s it! Hopefully you’ve found this little guide a helpful starting point to set up Google Tag Manager with Magento 2 Commerce, and also to access values from the Magento 2 data layer in your Google Tag Manager container.
2 Comments
John · 23rd June 2020 at 9:54 pm
Thanks for all the work that went in to this! When I go to import the .json file, I’m getting a pretty crazy error from within GTM, that reads “File Format is Invalid”:
JSON parsing error: mismatched input ‘5’ expecting {‘{‘, ‘[‘}
proceeded and followed by dozens and dozens of unknown characters. Has there been an update to this file?
Jon · 24th June 2020 at 8:24 am
Hi there, you just need to unzip the downloaded file first and then upload the contained JSON file or you’ll get that error. Once unzipped, it works fine (just tested again now). Does say in the post to unzip it first 🙂