Like a lot of people in ecommerce, I’ve been working with Google Analytics for many years; I remember well using Urchin as a server-side analytics solution on a number of sites prior to their acquisition by Google. The product that has evolved into today, particularly considering how much functionality you get for free, is pretty impressive and unsurprisingly it’s the most popular web analytics software on the planet by some distance.
There are certain things I always try and implement on any Google Analytics ecommerce account I set up/manage which I thought would be worth sharing; you may well do some or all of these already, but hopefully you’ll pick up the odd useful tidbit of information.
Before we get started…
This post assumes you’re reasonably familiar with Google Analytics and that you’ve got a functioning account already, with ecommerce tracking fully set up correctly. I’ve written a little bit previously about these fundamental settings; click here to read more
1) Referral Exclusions
There are a number of options in the Property Settings section of your GA which should be configured including:
- Enabling Data Collection
- Setting an appropriate Data Retention period
- Linking GA to your Adwords and Search Console accounts
They’re all fairly self-explanatory but the one Property level option that sometimes gets missed is adding to the Referral Exclusion List (under Property -> Tracking Info). This essentially prevents any sites on the list being treated as a new referring session if a visitor leaves your site and then comes back, so they’re most useful for payment gateways.
If you don’t set this up, revenue will track against that payment gateway referral in various reports, rather than the original source. There are ways around that but this is the easiest solution; an example list might be as follows but this should be based around the payments gateways you have implemented:
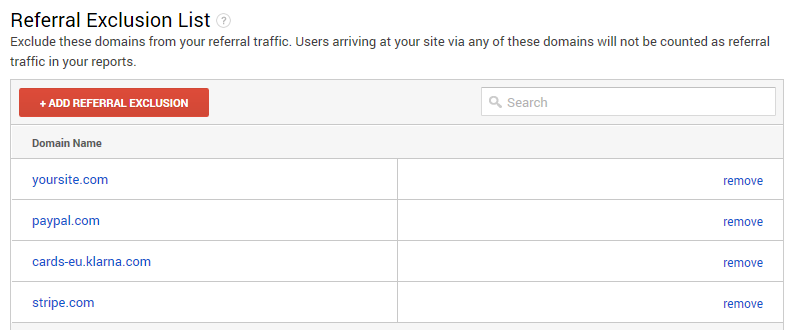
The only thing to be aware of here is if you have a genuine link from the payment gateway domain (e.g. you use Klarna and you’re in their shop directory); make you you’re just excluding the relevant subdomain used in the payment process in that instance.
2) Raw Data View
Before you create any Filters, you must set up a Raw Data View for your Google Analytics Property. If you’ve ever done any of Google’s official Analytics training courses, you’ll know it’s literally the first thing they insist you do, and with good reason.
Filters permanently change the data stored against a View (and these changes can’t be undone) so by maintaining a Raw Data View with no Filters applied, you’ll always effectively have a back up of that raw information in case you ever need it. You may never need it, but better safe than sorry eh?
You can create a new View nice and easily on the account admin screen:

One thing to remember is that for each new View you create (even the Raw Data View), you should still enable all the basic fundamental settings for ecommerce tracking, site search tracking and so on.
3) My standard Filters
Filters are an absolutely key part of getting your Google Analytics set up right for ecommerce; my standard fits-all-sites list which I like to apply is detailed below. Remember, you shouldn’t apply any Filters to your Raw Data View or Google will hunt you down and force you to participate in their upcoming documentary: “Google Plus – Gone but Never Forgotten”.
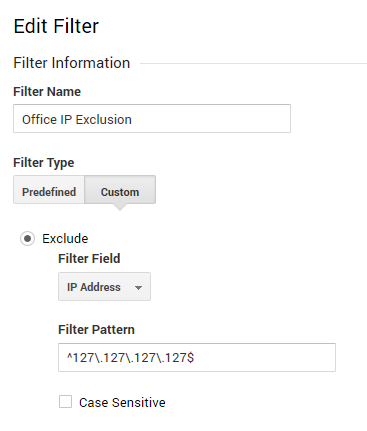
I. IP exclusion
A nice easy one to start; it’s important to exclude as much non-customer traffic as you can from your setup. This should include any IPs used by your office/VPN, any IPs used by any agency partners who regularly use the site and so on. This is particularly important if anyone in your organisation uses the front end of your site to place orders on behalf of customers.
This Filter can be created via either the ‘predefined’ or ‘custom’ route on the Filter creation page; it doesn’t really matter. For this one, the example below shows the ‘custom’ route:
II. Include only your Hostname
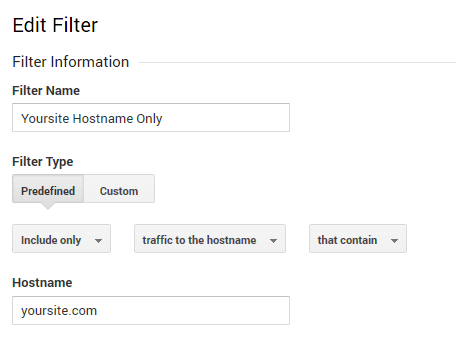
By default, any site/domain can add Google Analytics tracking code with your UA tracking ID and therefore send hits to your account; Google will include this in your reporting data, no questions asked. It could be caused by something innocent such as your development agency test site (e.g. yoursite.preview.youragency.com), or it’s also quite common to see this happen maliciously.
By adding a Filter forcing your View to only include traffic to your primary site Hostname, you can largely eliminate this issue. For the example below, I’ve created this Filter using the ‘predefined’ route:
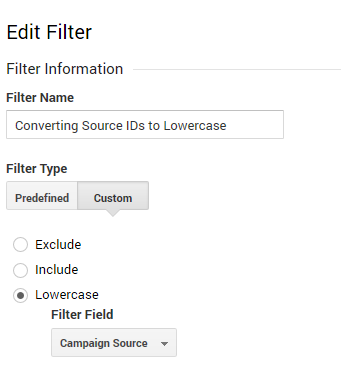
III. Lowercase Source and Medium
Google Analytics treats pretty much all the data values it receives as case-sensitive. This includes the Source and Medium, which are often set directly in the query string of a URL via the utm_source and utm_medium parameters respectively.
The problem really arises when different people use different letter casing to represent the same thing; for example if you have two team members posting organic social links on Facebook, of course you’ll ask them to follow a standard case convention when they’re tagging the links (you’re asking them to tag the links, right?), but human error is fairly inevitable at some point.
Consequently, you might end up with some links tagged with “utm_source=Facebook&utm_medium=Social” and others tagged with “utm_source=facebook&utm_medium=social”, which will show as separate Source/Medium combinations in Google Analytics.
Fortunately, this is really easy to solve with the following two Filters:
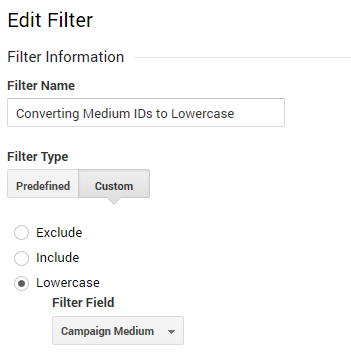
You might have noticed I’ve not included a Filter for lowercasing the utm_campaign parameter here. You can do this, but I like to encourage that the Campaign code is kept fairly unique rather than repeated across multiple links. In addition, third party systems (Mailchimp is a good example) will use multi-case Campaign codes as standard, so if you’re converting those all to lowercase, it can make it more difficult to match that data across multiple systems.
IV. Lowercase internal Search Term
Similar to the above but worthy of its own point, terms used on the internal site search of your ecommerce site will be logged case-sensitively by Google Analytics. But, for 99.9% of sites, the case won’t make a difference to the internal search results returned and you’ll therefore want to group those essentially identical terms together. This can be done nice and easily with the following Filter:
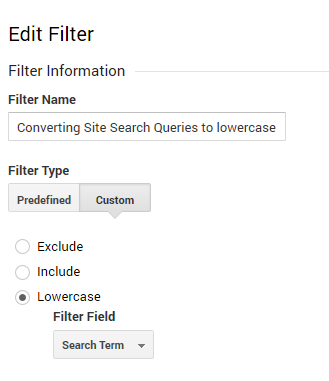
As a little aside, I saw something on social media a few weeks ago highlighting this issue and stating that you should get your website to lowercase the search term before it’s passed to GA. I mean sure, if you like torturing yourself by hacking around the core code of your ecommerce platform then that’ll work too, but this is probably a little bit less painful 🙂
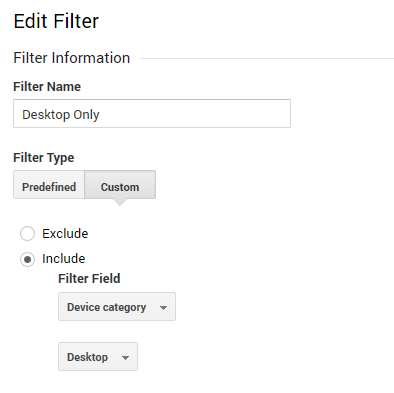
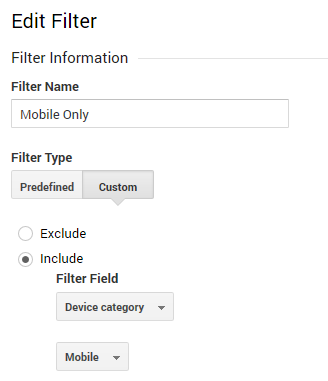
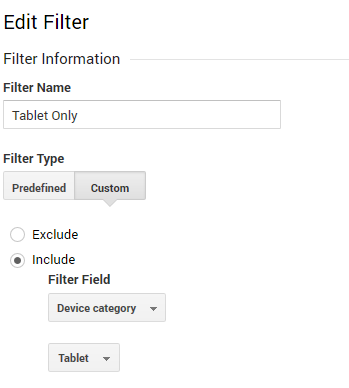
V. Desktop / Tablet / Mobile Filters
For most ecommerce sites, I find it really useful to create filtered Views by Device Category. Of course, you can drill into virtually every report in Google Analytics by device, but creating a separate View speeds up analysis considerably of what is likely one of the most important factors in your ecommerce site performance. To start with, just create a simple Filter for each Device Category:
Creating new Views based around your new Filters
Once the above Filters are created, you then need to apply them to your existing Views / create new Views. My standard View list for new sites looks something like this:
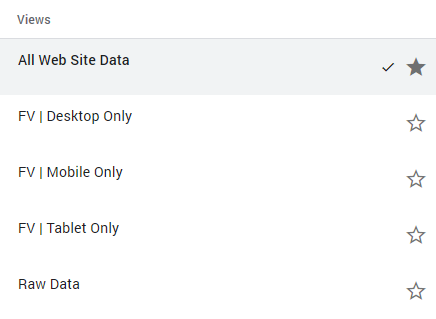
- For the All Web Site Data View, apply all the Filters except any Device Category Filter.
- For the Desktop/Mobile/Tablet Views, apply the appropriate Device Category Filter and all other Filters.
- For the Raw Data View, apply no Filters or Google will suspend you permanently above an active volcano (I know, I know, you’ve got that now).
- It can sometimes be a good idea to create an additional Test View for testing new Filters, if you have the time.
Other Filters you might consider
The above are really my standard go-to Filters for any ecommerce site I work on, but there are of course a myriad of other Filter/View combinations that you may find useful.
One that can be handy is a filtered View based around the country location of your site visitors; if you only ship domestically for example, this can give you a slightly “fairer” conversion rate to report back up the chain of command, if you’re so inclined.
Another Filter I would apply if possible is lowercasing any Order Coupon Code values used as typically customers type these in a variety of cases. But, as yet I’ve not figured out how to do this on the Google Analytics side, feel free to let me know in the comments below if you have.
4) Improved Channel grouping
When you’re working with ecommerce businesses like I do, and you’re thinking about how to get the most out of Google Analytics, you need to consider not just the data you’re looking at in order to make decisions, but also the data you’re reporting back to others in the business and the level of granularity that should (or should not) contain.
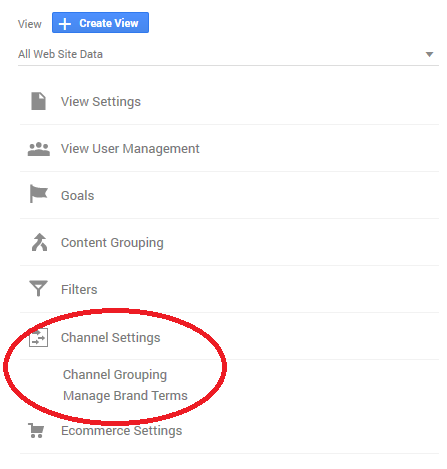
In my experience, the Channels report is the one report in Google Analytics all levels of a business can digest and reflect on pretty easily. Unfortunately, it doesn’t quite do all it should out of the box, but that can be remedied fairly easily by adjusting the Channel Groupings. Your Channel Settings can be found in the Admin -> View section of your account:
Splitting Paid Search into Generic/Branded
I’d probably end up writing another entire blog post if I started talking in detail about the differences between generic and branded paid search, but suffice to say for any ecommerce site, it’s something you want top level visibility of at a Channel level.
Fortunately, Google Analytics pretty much does all the hard work for you; after entering your brand terms (e.g. your brand name and direct variants) in the ‘Manage Brand Terms’ section, you’ll be presented with this handy little pop up:

You really want to click ‘Yes’ here; GA will then add the new Channels for you to your Channel grouping and you’re all sorted. You can leave the existing ‘Paid Search’ Channel in place, just to mop up anything GA can’t assign to brand/non-brand for any reason.
Create a Paid Social Channel
This is the most glaring out-of-the-box omission on the Channels report; by default all your organic and paid social traffic will be mixed into the one ‘Social’ channel. Considering the amount of budget you’ll likely be throwing at paid social in order to grow your ecommerce business, you really need better top level visibility than this on the Channels reports.
The solution is to create a new ‘Paid Social’ Channel; this will require paid social links from all platforms to be tagged with the appropriate utm_source and utm_medium values, but you should really be doing this anyway. My standard Channel definition is as follows:
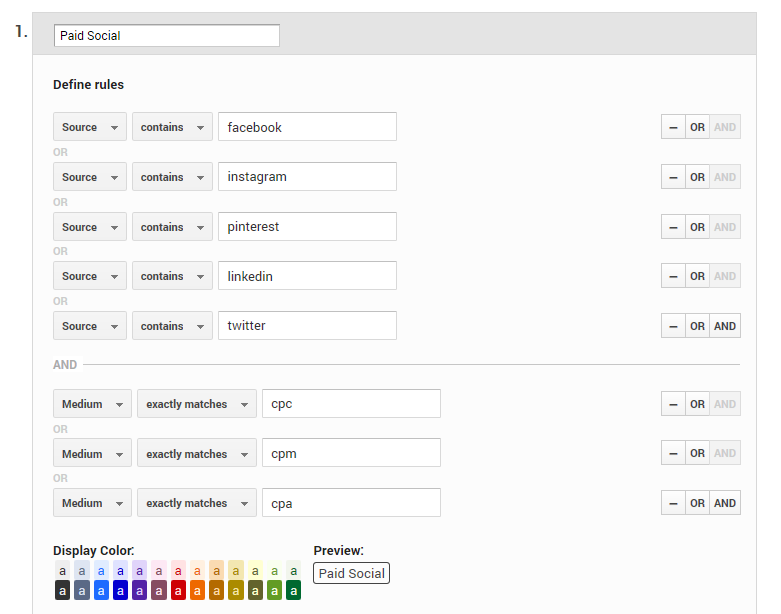
As you’re already applying a lowercase Filter to the Source and Medium (see, I told you that would be useful), you don’t need to worry about case variations when setting this up.
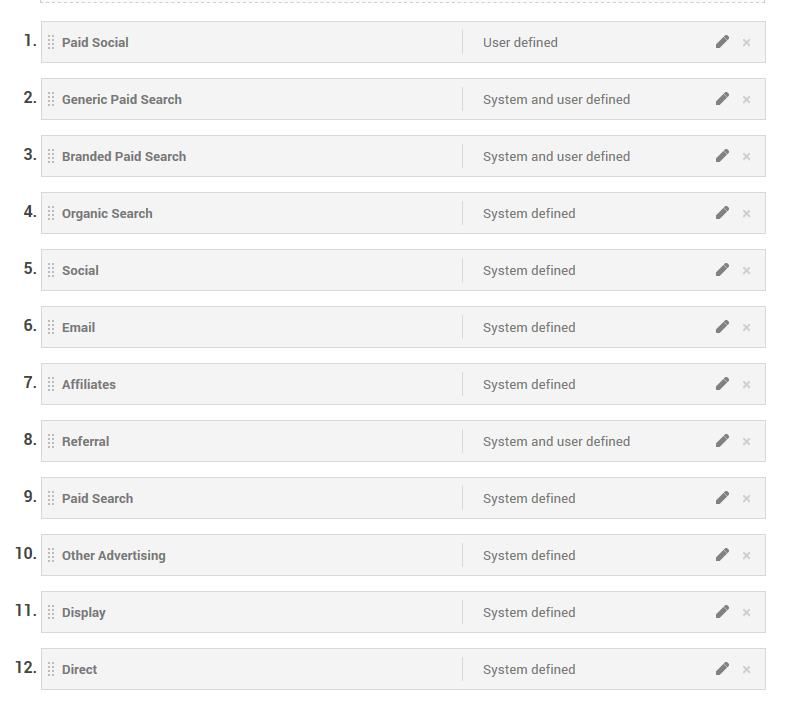
Channel ordering
The order Channels are applied is more important than just how they appear in reports; the basic rule is that you want to put any ‘user defined’ Channels before any ‘system defined’ Channels to avoid traffic you want to show against your sparkly new Channels being swallowed up first by an existing standard GA Channel; the following works for me:
Anything else?
There is of course a huge amount more you can do in Google Analytics, but I think this post is probably long enough already; hopefully you’ve picked up some useful tips which can broadly be applied to the set up of any ecommerce GA account.
Content Grouping can be useful in some situations, as can setting up Views with alternative Attribution Models, and I do use Segments too, but I’ll save all that for a follow up post 🙂
Are there any other indispensable things you like to implement on any GA ecommerce account you set up and manage? Let me know in the comments below!
0 Comments